Recently, I purchased an Odroid-C2. This is a great little single-board computer by Hardkernel
The device has an Amlogic S905 SoC. Complete with a quad-core Cortex-A53 @ 1.5Ghz, 2GB DDR3 RAM, and gigabit ethernet. It’s quite a powerful little board with plenty of GPIO and RAM to work with. My favorite part about this board is the eMMC connector on-board, which blows away even UHS-1 MicroSD speed. This makes it a heavy competitor to the Raspberry Pi 3 in my opinion.
One of the first things I do when I get a new piece of hardware is identify the debug ports. A molex UART connector is available on most/all of Hardkernel’s products. However, sometimes debugging more in-depth is required, especially since this board is still stuck on the 3.14 kernel. Progress is being made to bring it up to 4.y, but it will be some time before all the drivers are finished.
I had recently been reading an article about a vulnerability and exploit on the Amlogic S905 chipset here and found the lack of any authentication for secure boot beyond a simple SHA256 hash. The author of the article was able to dump the bootrom of the chip using this vulnerability. He had written a kernel module for issuing SMC calls to their implementation of TrustZone.
Upon inspecting the u-boot source for this device, I discovered a good amount of the command IDs for various trusted functions. One that stuck out to me was for enabling JTAG. All the 0x820000xx values are command IDs for TrustZone. This is only a partial list of those that exist.
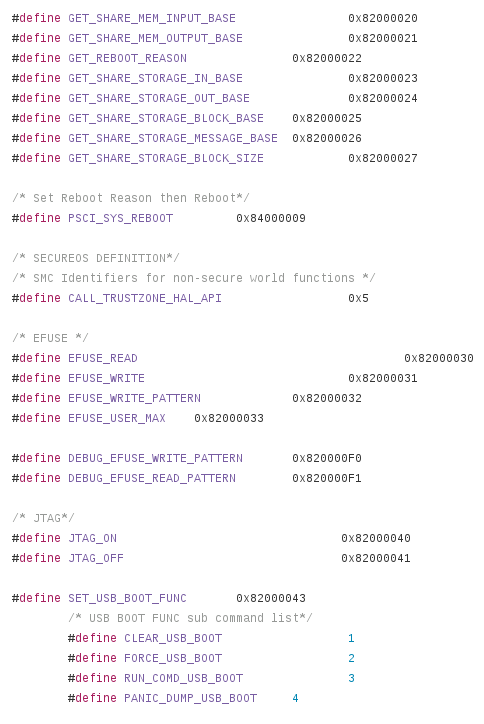
The command simply issues an SMC call to TrustZone to enable one of four different TAPs. Two were power domains or system fabric possibly (still haven’t figured it out.) The other two were the Cortex-A53 (the main processor) and a Cortex-M3 (possibly a secure coprocessor? System Control and Power)
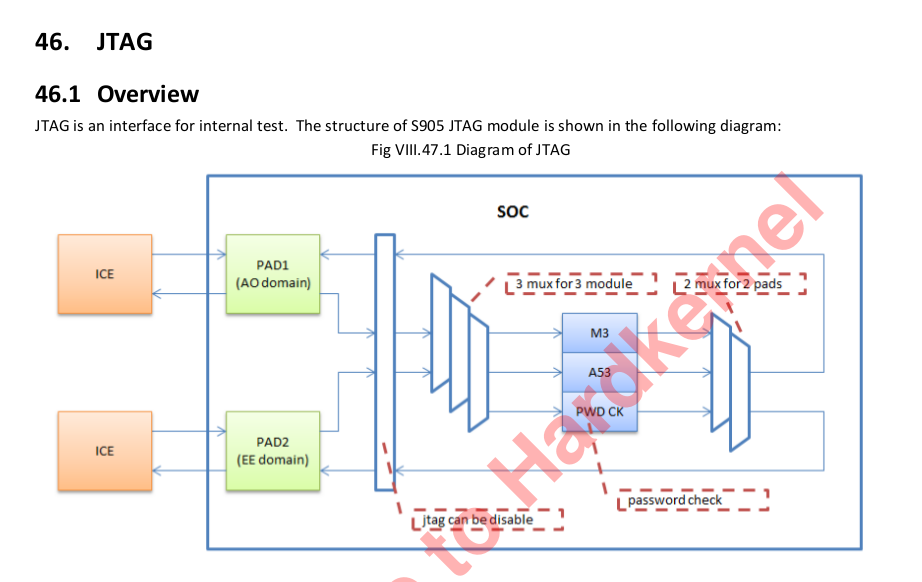
However, with little to nonexistent documentation, I felt it would be a good place to poke around this lesser known chip. Now, if you ask around the Odroid community, they’ll tell you that JTAG is only available through the SDIO pins using a special debug board. I had seen these before, but figured a quick look at the schematics would be worthwhile to see if there was another option rather than build this.
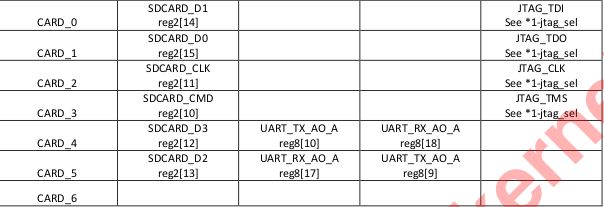
A quick scan through the schematic revealed that TMS, TDO, TDI, and TCK were also routed to the I2S pins (which happen to have a header on this board, next to the heatsink.)

I decided to connect those pins up to my JTAG adapter and give it a shot. No such luck. These are multi-function pins with a muxer, so I assumed maybe I hadn’t set the right alternative function on them. Another scan through the documentation revealed no information other than the pins exist. The documentation referred to a section that was omitted from the public datasheet. No matter, we’ll find a way.
Using my UART console in u-boot, I tried using the command ‘jtagon apao’ which according to the comments in the code, should enable the Cortex-A53 DAP. Sure enough, that did the trick, and the A53 was now exposed. I was unable to actually halt the chip or inspect the chain successfully, for reasons I am unsure of at this point (could be security related, I know it’s possible to enable a password on the TAPs to prevent debugging. issue was lack of ARMv8 support for OpenOCD and missing -ctibase since ARMv8 debugging requires CTI information for halt and resume)
 After repeated failed attempts to initialize the debug port on the A53, I decided to take a look at the other tap, the ‘SCP’ chip. I rebooted back into u-boot and issued the command ‘jtagon scpao’ and the Cortex-M3 DAP appeared. My first attempt, I was able to halt the chip! From this TAP, I could see the bootrom and I believe BL301 (this chip uses the standard ARM trusted firmware scheme.) Certain secure areas of memory were still inaccessible, which resulted in a reboot or lockup. To reiterate, all the JTAG command was doing in u-boot was issuing a simple SMC command, so I asked myself why I couldn’t enable this while the device was booted into Linux.
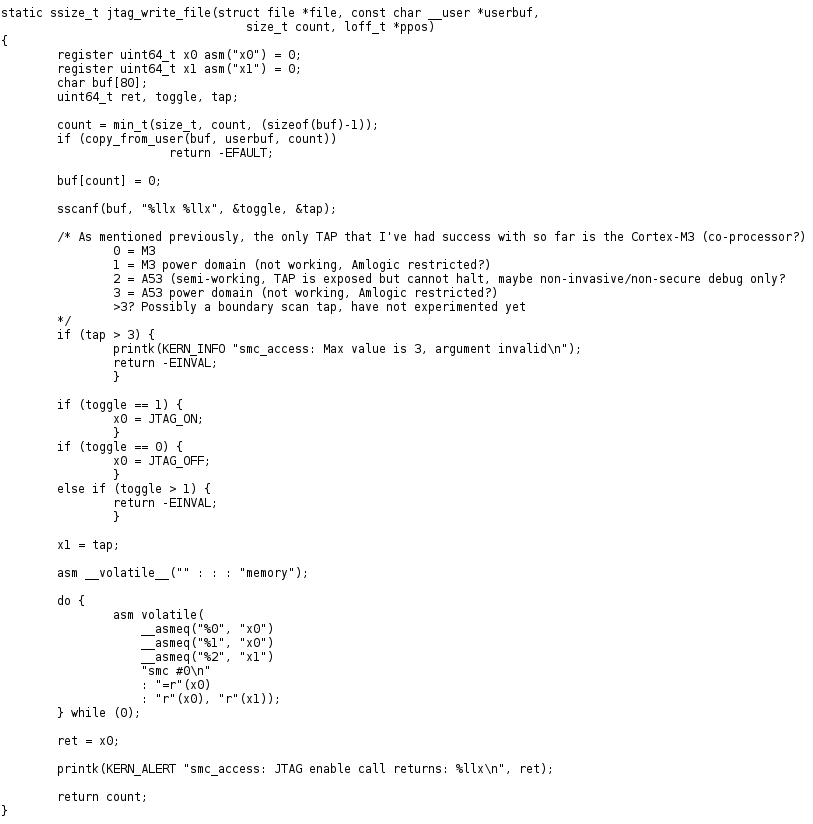
Circling back to the S905 post about a secure boot vulnerability, the author wrote a debugfs driver that allows passing SMC calls. I realized a simple rewrite of this code would result in me being able to enable JTAG from Linux. You can see what I did here. (Inline assembly can be painful sometimes…) Upon my first try with the SCP chip, I was able to connect and halt right away. Unfortunately I still haven’t been able to connect the A53, or fully understand the purpose of the ‘SCP’ processor, but I had made some headway.
When I get some free time (rare these days) I will take a look at the password checking mechanism, and if enabled, the password should be in the efuses. I’m hoping this post will serve as a resource for those looking to do JTAG debugging on this board or SoC, and possibly get it working. If you have any questions or comments, feel free to leave them in the comment section!
UPDATE: I was able to start debugging the Cortex-A53 on this board using some ARMv8 patches for OpenOCD. It’s still experimental at this moment, but generally works well. The issue was related to lack of ARMv8/DAP support in OpenOCD. Since then, I can successfully halt and resume, and read memory. One side note, I’ve discovered that SCP stands for ‘System Control and Power’ which is pretty self-explanatory.
Here is my config for the Cortex-A53:
############# config ################
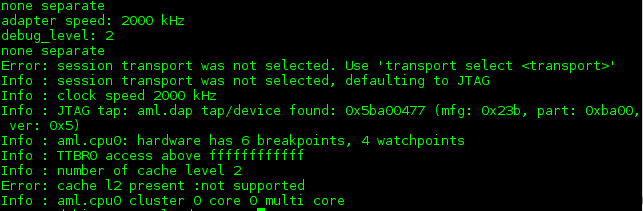
adapter_khz 2000
debug_level 2
reset_config none
gdb_target_description disable if { [info exists CHIPNAME] } {
set _CHIPNAME $CHIPNAME } else {
set _CHIPNAME aml
}
if { [info exists DAP_TAPID] } {
set _DAP_TAPID $DAP_TAPID
} else {
set _DAP_TAPID 0x5ba00477
}
jtag newtap $_CHIPNAME dap -irlen 4 -ircapture 0x1 -irmask 0x03 -expected-id $_DAP_TAPID
set _TARGETNAME $_CHIPNAME.cpu0
target create $_TARGETNAME aarch64 -chain-position $_CHIPNAME.dap -coreid 0 -dbgbase 0x80410000 -ctibase 0x80420000
#set _TARGETNAME $_CHIPNAME.cpu1
#target create $_TARGETNAME aarch64 -chain-position $_CHIPNAME.dap -coreid 1 -dbgbase 0x80510000 -ctibase 0x80520000
#set _TARGETNAME $_CHIPNAME.cpu2
#target create $_TARGETNAME aarch64 -chain-position $_CHIPNAME.dap -coreid 2 -dbgbase 0x80610000 -ctibase 0x80620000
#set _TARGETNAME $_CHIPNAME.cpu3
#target create $_TARGETNAME aarch64 -chain-position $_CHIPNAME.dap -coreid 3 -dbgbase 0x80710000 -ctibase 0x80720000
init
aarch64 dbginit
And for the Cortex-M3 (System Control and Power)
############# config ################
adapter_khz 4000
debug_level 2
reset_config none

jtag newtap aml dap -irlen 4 -ircapture 0x1 -irmask 0x03 -expected-id 0x4ba00477 -enable

target create aml.cpu cortex_m -chain-position aml.dap -coreid 0
Great post. I just got a C2 myself and was hoping to get JTAG working. Haven’t tried it yet but these are some good tips. I’m currently trying to extract the usb drivers from the Hardkernal Linux build to see if I can get it running on bare metal, but still have a way to go. Do you think an older $15 JLink might work for debugging more recent chips? It only lists processors up to Cortex A17 and M33 but I’m not really familiar with JTAG.
Thanks for the comment! I think more important than the adapter is the software support of a debugger for ARMv8/Aarch64. I know that OpenOCD has experimental support, which is what I was experimenting with. Realistically all that needs to happen is shifting in data to the instruction registers. I think most JTAG adapters would work fine, even if not “officially” supported.
Nice article, a kind of kick starter 🙂
I have segger Jlink, and segger doesn’t say that is supports cortex A53. What is JTAG adapter you have used.
I used this which is just an FTDI (FT2232) adapter. I also used bleeding-edge maintainers build of OpenOCD for the ARMv8 support. The adapter itself works great and is pretty cheap.
Thanks Ryan.
Nice article, opens up a lot of perspectives. It seems that the master branch on openocd has some armv8 support already. Would you mind sharing your board config file for getting the A53 to work ?
Sure, this is what I came up with (aml_gxbb.cfg):
############# config ################
adapter_khz 2000
debug_level 2
reset_config none
if { [info exists CHIPNAME] } {
set _CHIPNAME $CHIPNAME
} else {
set _CHIPNAME aml
}
if { [info exists DAP_TAPID] } {
set _DAP_TAPID $DAP_TAPID
} else {
set _DAP_TAPID 0x5ba00477
}
jtag newtap $_CHIPNAME dap -irlen 4 -ircapture 0x1 -irmask 0x03 -expected-id $_DAP_TAPID
set _TARGETNAME $_CHIPNAME.cpu0
target create $_TARGETNAME aarch64 -chain-position $_CHIPNAME.dap -coreid 0 -dbgbase 0x80410000 -ctibase 0x80420000
#set _TARGETNAME $_CHIPNAME.cpu1
#target create $_TARGETNAME aarch64 -chain-position $_CHIPNAME.dap -coreid 1 -dbgbase 0x80510000 -ctibase 0x80520000
#set _TARGETNAME $_CHIPNAME.cpu2
#target create $_TARGETNAME aarch64 -chain-position $_CHIPNAME.dap -coreid 2 -dbgbase 0x80610000 -ctibase 0x80620000
#set _TARGETNAME $_CHIPNAME.cpu3
#target create $_TARGETNAME aarch64 -chain-position $_CHIPNAME.dap -coreid 3 -dbgbase 0x80710000 -ctibase 0x80720000
init
aarch64 dbginit
Hi, sir how can I would contact you. I’m from India I pretty much interested in your knowledge. Pl give me your e-mail I’d my I’d: [email protected]
Hi ryan,
I’ve bricked my S905W device so it crashes while running u-boot (https://pastebin.com/C77e1fME) . Do you think it would be possible to fix it using JTAG? Either to erase the eMMC card or to force it to boot into upload mode for use with USB Burning Tool?
Great documentation. How did you determine the adapter_khz for both ap and pmu? I see you used 2000 KHz for the A53 and 4000 KHz for the M3.
Every other example I have seen shows 1000 KHz. And other sources indicate that one should be able to use up to 1/6 the speed of the processor.
Just curious if you can shed any light on that.